Managed Search Quick Start Guide
The SearchStax Managed Search service Quick Start page contains everything you need to know to take a Dedicated Solr Deployment for a test drive. We supply the Solr configuration and sample documents for you to load to make your trial go smoothly.
This page was illustrated using a Free Trial user account. The deployment is a two-node cluster. The instructions work equally well with a paid account except that the UI will offer you a broader range of features and options. Note that the instructions apply to both Linux and Windows.
Contents of this Solr Guide:
- Set Up an Account
- Create a Solr Deployment
- Install the Zookeeper Script
- Create an IP Filter
- Upload a Solr Configuration
- Create a Collection
- Index Documents
- Search the Collection
1. Set Up an Account
To sign up as a SearchStax user, go to the SearchStax Free-Trial page. You may create a single-node deployment or a two-node cluster and experiment with it for 14 days, free of charge. No credit card number is required.
For additional information concerning accounts, see the Account Setup page.
2. Create a Solr Deployment
Deployments are created from the SearchStax Dashboard.
For a Free Trial, the system will take you directly to the New Deployment screen.
You will need to choose the appropriate Cloud Provider and the Plan that works for you. (The Free Trial program offers a single-node deployment or a two-node cluster in Amazon Web Services (AWS), Microsoft Azure, or Google Cloud.)
Providers, Regions, Deployments, and Prices
Solr Versions Supported by SearchStax
Cloud Providers and Regions Supported by SearchStax
Select a Product for Pricing Details
Please contact us for complete information on Managed Search providers, regions, and Solr deployment plans.
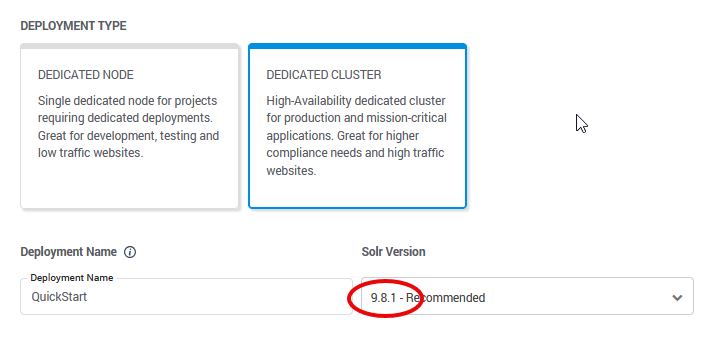
SearchStax offers a wide variety of Solr versions for your convenience. For this exercise, we assume that your deployment uses Solr-9.8.1.
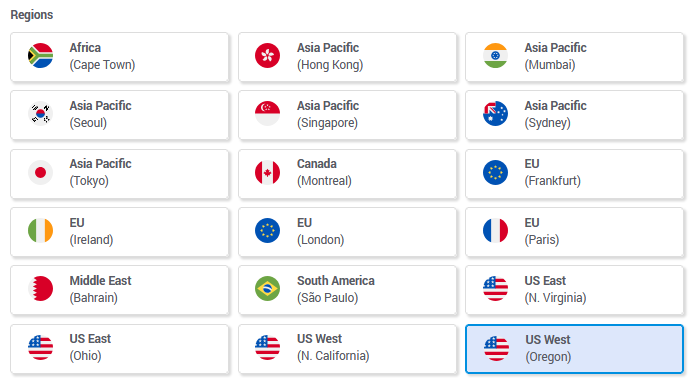
It will be necessary to choose a Cloud Provider and a region to house your deployment. Choose the region that is close to you.
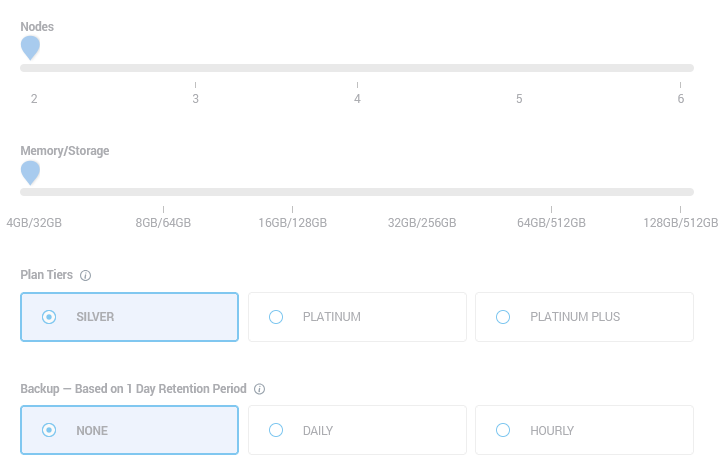
The next few controls are grayed out in the Free Trial experience. In a paid account, they would let you set the number of nodes, size of memory and disk storage, support plan tier, and backup frequency.
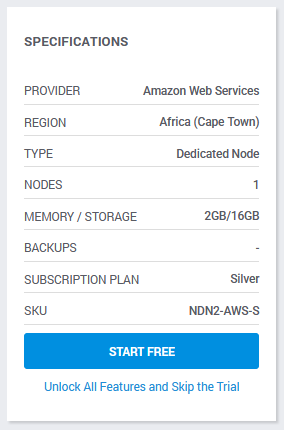
This summary table describes your deployment and its features. In paid account, It also calculates the cost of this combination of features.
It usually takes five minutes to set up a single-node deployment, and up to fifteen minutes to set up a cluster, using AWS or GCP. Azure setup times range from twenty minutes to an hour. Feel free to explore our documentation until the process is completed.
When the deployment is ready, view the deployment summary card on the Dedicated Infrastructure screen by clicking the “Card View” button (upper right):
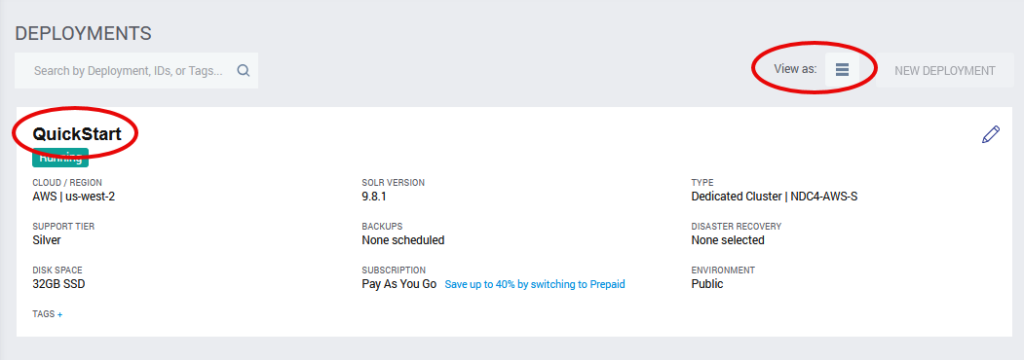
This display tells us that the deployment is up and running.
To check the health of the deployment, click QuickStart, then Monitoring and CPU, Memory, JVM. Check the boxes beside the two Solr servers (usually nodes 4 and 5). You can easily see that the system is running under almost zero load (CPU below 2% in this image).

To view the server details, click Overview. This opens the deployment details page.
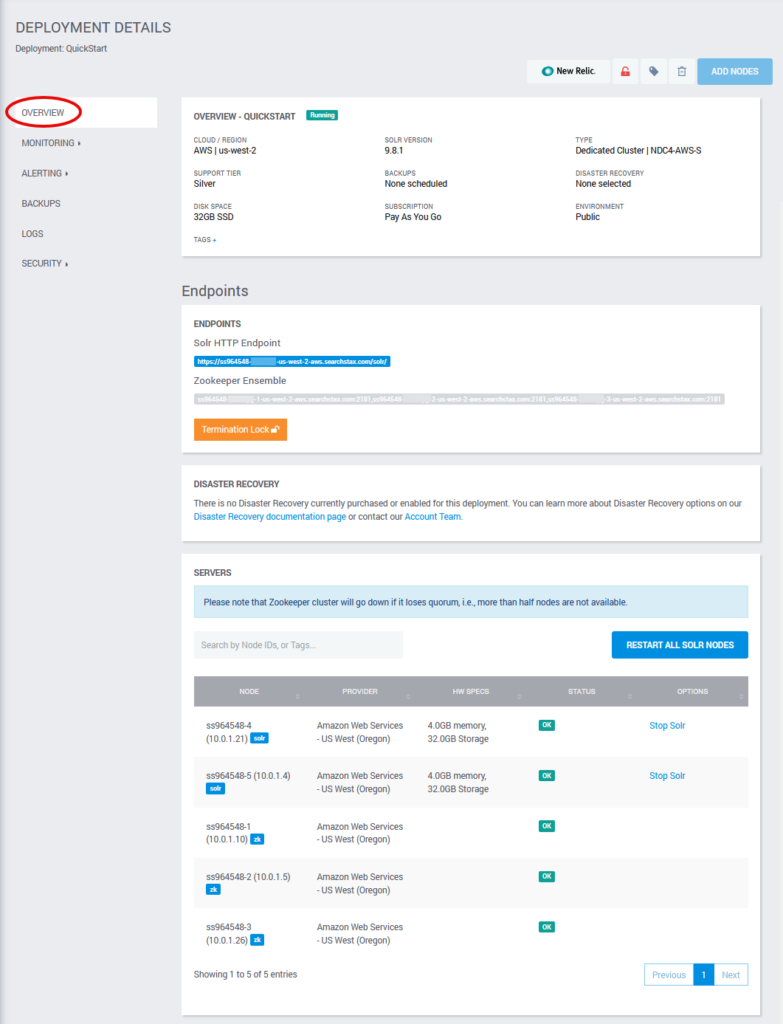
The details page shows the status of all deployment servers plus the URLs of the deployment’s Solr HTTP Endpoint and Zookeeper Ensemble. This is an NDC4 cluster. It has two Solr servers (nodes 4 and 5) and three independent Zookeeper servers. The table shows the health of all five servers.
The Termination Lock button shields this deployment from unintended deletion by someone using the SearchStax API. It is a peace-of-mind feature that does not enter into the current exercise.
3. Install the Zookeeper Script
Apache ZooKeeper is a service for maintaining configuration information. In a SearchStax Managed Search deployment, Zookeeper is the central repository for your Solr configuration files.
A single-node deployment (such as the NDN2) has only one Zookeeper instance. It runs on the same server as Solr. A cluster (NDC4) has three Zookeeper instances, each on its own independent server. They are collectively called “the ensemble.” (For more information on this architecture see Apache Solr Architectures for Cloud Deployment.)
Zookeeper includes a standard command-line script, zkcli.sh, for managing your Zookeeper ensemble. Solr provides a modified version of ZKCLI that includes Solr-specific features. We have further modified the Solr ZKCLI by adding some data for this QuickStart exercise. We provide both Linux and Windows versions of the script.
You can download the SearchStax ZKCLI ZIP file here: searchstax-client-master.zip. It is about 270 MB.
zkcli requires Java
To run zkcli, you will need Java. See What if zkcli returns an error? for more information.
Unzip the file on your local computer. The top-level directory is \searchstax-client-master. There are subdirectories for different versions of Solr.
Navigate to the scripts subdirectory (\searchstax-client-master\solr-9\scripts). Locate zkcli.sh and zkcli.bat in that directory. These are the Linux and Windows versions of the script, respectively.
zkcli Help
If you run the ZKCLI script using the “help” keyword, it displays a lengthy list of options and examples. See What else can I do with the ZKCLI script? for examples.
4. Create an IP Filter
When SearchStax creates a new Solr deployment, it locks down the Zookeeper ensemble so that it cannot be reached from the Internet. To upload a configuration to Zookeeper, you have to add an IP Filter that whitelists your work computer or subnet.

- From within a Deployment’s details page (where you saw the list of servers), click on the Security > IP filter menu.
- Click on Add Row.
- Add a specific IP address in the empty field. Note that SearchStax can detect your computer’s IP address. Click My current IP to enter it automatically.
- Select the service you need access to (Zookeeper in this case).
- Click Save changes.
To remove a filter, click on the X button and then Save Changes.
5. Upload a Solr Configuration
It is easy to deploy your Solr project to the cloud. The first step is uploading your Solr configuration files to the Zookeeper ensemble of your SearchStax deployment. Zookeeper, in turn, distributes the configuration files to the server(s) that need them.
We have provided example configuration files and data for the purposes of this exercise.
In a terminal window, navigate to the \searchstax-client-master\solr-9\scripts directory and then run the appropriate script:
Linux (Bash):
$ ./zkcli.sh -zkhost <zookeeper URL> -cmd upconfig -confdir <Solr configuration> -confname <configuration name>
Windows PowerShell:
> .\zkcli.bat -zkhost <zookeeper URL> -cmd upconfig -confdir <Solr configuration> -confname <configuration name>
where <zookeeper URL> is the Zookeeper Ensemble URL from your deployment details page. If you are running a cluster, the <zookeeper URL> is a comma-separated list. Use the entire list as the <zookeeper URL>.

<Solr configuration> is the path to your Solr configuration directory, which is ../configsets/_default/conf/ for the solr-9 ZKCLI. <configuration name> will be Zookeeper’s internal name for this configuration (test).
Look in your email for a message from SearchStax announcing the creation of your new deployment. This message contains a customized ZKCLI command with values appropriate to your project. You can copy and paste the command into your Bash or PowerShell window.
./zkcli.sh -zkhost ss123456-na1labcj-1-us-west-aws.searchstax.com:2181,ss123456-na1labcj-2-us-west-2-aws.searchstax.com:2181,ss123456-na1labcj-3-us-west-2-aws.searchstax.com:2181 -cmd upconfig -confdir ../configsets/_default/conf/ -confname test
ZKCLI always issues boilerplate warnings, so don’t be alarmed by those messages. When successful, you’ll also see a number of INFO messages scroll by but no explicit confirmation of success. This is normal.
ZKCLI Connection Errors
If you have difficulty running ZKCLI, see What if ZKCLI returns an error? and Can’t connect to Solr or Zookeeper.
If you are running Solr 9+, go straight to these remarks about Solr 9+ and Java 11+.
6. Create a Collection
A collection is a logical index. The next step is to create a collection so we can send data to it.
Don’t use periods in collection names!
Although Solr permits periods in collection names, the Performance Monitoring feature cannot display the history of a collection with a period in its name.
The easiest way to create a collection in the Solr versions supported by SearchStax is to open the Solr Dashboard and fill out a simple form:
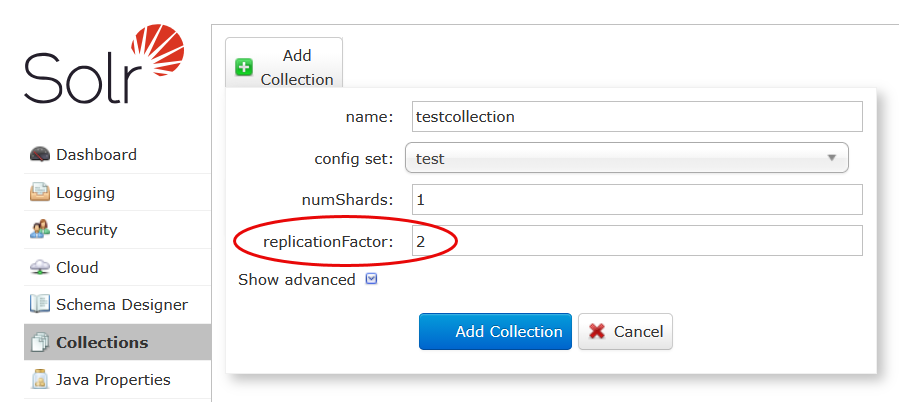
From the Deployment Details page, click on the deployment’s Solr HTTP Endpoint URL. Select the Collections tab on the left. Click the Add Collection button.
Fill out the pop-up form:
- For this exercise, the name is
testcollection. - When we uploaded the configuration using ZKCLI, we called the config set
test. - The numShards parameter should always be 1 unless a Solr expert tells you otherwise.
- The replicationFactor is the number of Solr servers in your deployment. It is critical to set it correctly. It does not always default to the correct value.
- Click the Add Collection button.
Pay attention to ReplicationFactor!
The replicationFactor must be equal to the number of Solr nodes in the cluster.
See Replicas missing on some cluster nodes! for a discussion of the subtle things that can go wrong because of this issue.
7. Index Documents
Once the Solr index has been initialized by creating a collection, you can load your documents.
In a Bash or PowerShell window, navigate to the \searchstax-client-master\solr-9\data directory. This is where our example data file, sample.json resides. This file contains two extremely brief documents:
[
 {"id" : "TestDoc1", "title_s" : "test1"},
 {"id" : "TestDoc2", "title_s" : "another test"}
]
Run the following command in the Linux terminal window:
Linux (Bash) or Windows PowerShell:
$ curl -X POST -H 'Content-type:application/json' -d '<datafile>'
    '<Solr HTTP Endpoint><collectionName>/update?commit=true'
<datafile> is the path and file name of the file to upload (either the full file path or ‘@sample.json‘ if the focus is in the data directory). <Solr HTTP Endpoint> is the URL from the SearchStax dashboard for your deployment. <collectionName> is the name of the new Solr collection (testcollection).
The email message about your new collection contains a cURL command similar to this one. Copy it and paste it into your command window. Note: For Windows, put single-quote (‘) marks around ‘@sample.json’.
$ curl -X POST -H 'Content-type:application/json' -d '@sample.json' 'https://ss123456-na1labcj-us-west-aws.searchstax.com/solr/testcollection/update?commit=true'
On success, you’ll see a message confirming that two records have been committed to the index.
8. Search the Collection
A simple query will demonstrate that all of the previous steps have been accomplished correctly.
The easiest way to query your collection is to return to the Solr Dashboard and use the query page.
- From the Deployment Details page, click on the deployment’s Solr HTTP Endpoint URL.
- Select the testcollection in the droplist in the left margin.
- Click the Query tab, also in the left margin.
- Scroll to the bottom of the Query page and click the Execute Query button.
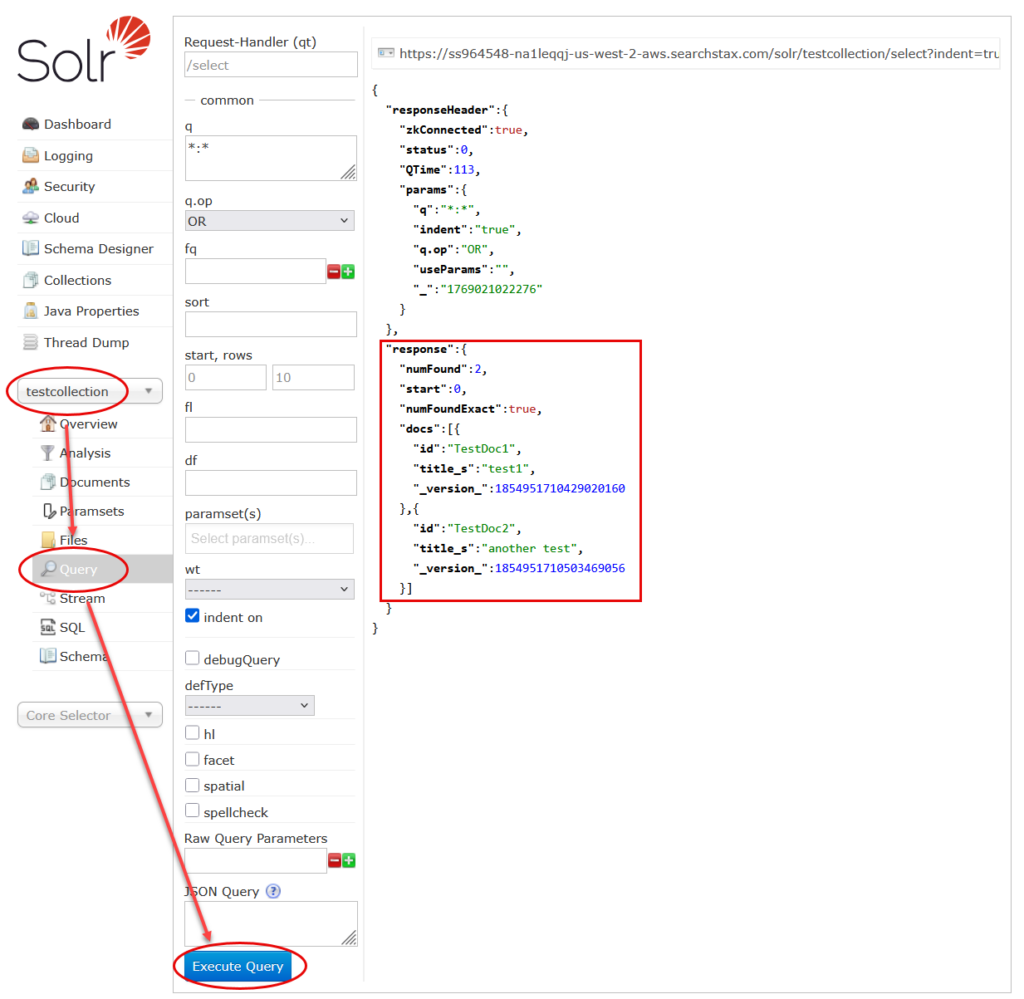
If you have been successful, you will see our two sample documents in the response as shown above.
Note the URL at the top of this display. You can copy/paste this URL into any browser and obtain the same response. The only difference is that certain characters must be % encoded in the query string, notably the “*:*” must be encoded as *%3A*.

Next Steps
Success! You have created your first SearchStax deployment with a Solr Collection. You have deployed a Solr project, loaded documents into the index, and have performed a successful query!
Now you can explore the rest of the documentation to learn the details of everything that SearchStax can do for you.
Contact Us!
Don’t hesitate to reach out to the SearchStax Support Desk. We are happy to answer your questions.