Managed Search Single Sign-On (SSO) for Okta
The SearchStax Managed Search service now offers the ability for clients to set up Single Sign-On (SSO) to let their users log into SearchStax apps with a single ID and password that works across multiple software systems.
We use the open standard Security Assertion Markup Language (SAML) to allow identity providers (IdP) to pass authorization credentials to service providers (SP). This page provides instruction to use Okta to implement SSO for Managed Search.
SSO is an add-on Managed Search feature that is purchased separately. If you are interested in SSO, please contact Sales.
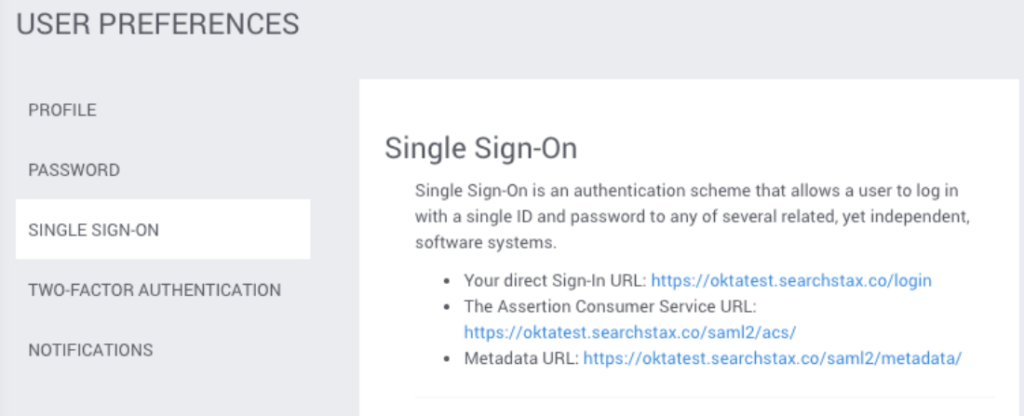
Once SSO is enabled for your account and a domain is set up, the admin is able to see the configuration options in the User Preferences screen of the Managed Search Dashboard.
The following steps explain how it can be set up for Okta.
Instructions
Once your account has been enabled for SSO by the SearchStax team and a domain has been provided, the account owner and/or admin can see the option to complete set up. This option is found in the User Preferences screen of the Managed Search Dashboard:
1. You need to be an Admin in Okta to set up the SearchStax Application.
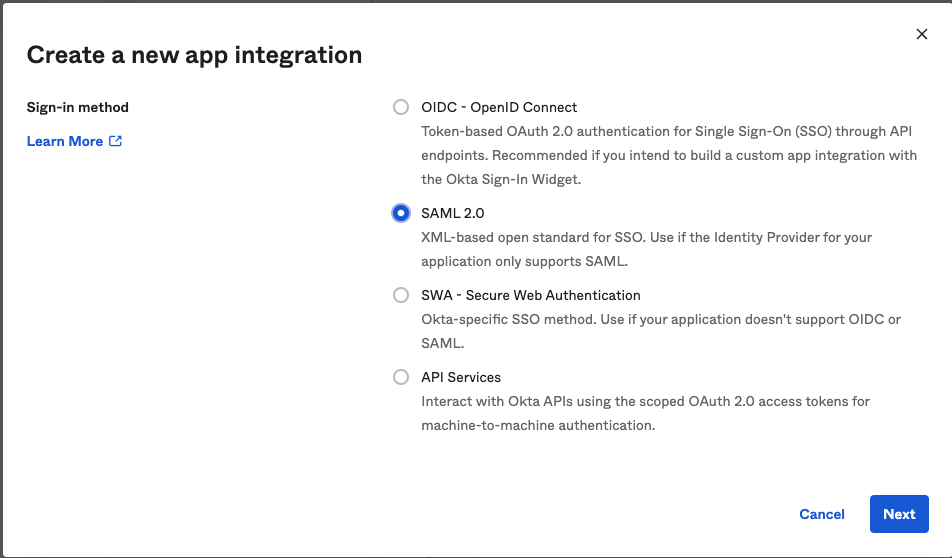
2. Go to the Okta Admin Console. Click on Applications > “Create App Integration”. Select “SAML 2.0” and click on “Next”
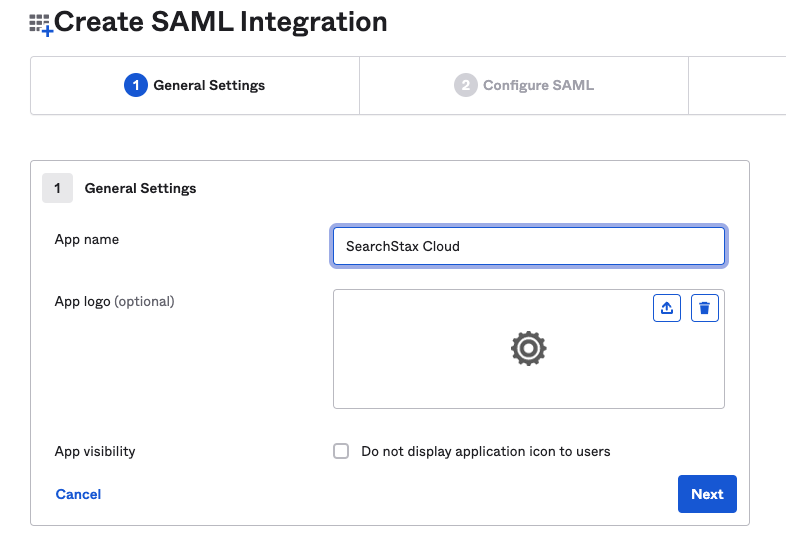
3. Enter the name of the App as “SearchStax Cloud” and click on Next
4. Configure the SAML Settings with the following information:
- Set the “Single sign on URL” as the Assertion Consumer Service URL provided in SearchStax Cloud
- Check on “Use this for Recipient URL and Destination URL”
- Set the “Audience URI”as the Metadata URL provided in SearchStax Cloud
- Set the “Name ID format” as “Unspecified”
- Set the “Application username” as “Email”
- Set the “Update application username on” as “Create and update”

5. Click on “Show Advanced Settings” and set “Response” and “Assertion Signature” to “Signed”. Below is a sample of Advanced Settings
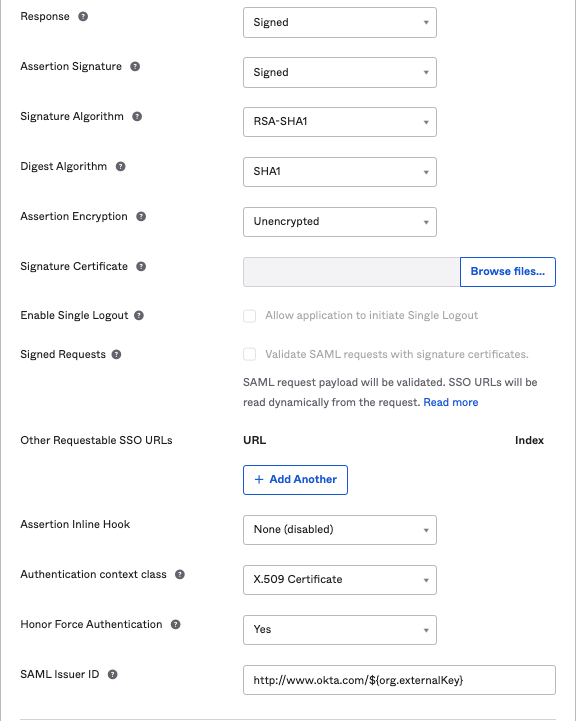
*If you change the response and assertion settings, you will need to also change the SearchStax Cloud “Assertions responses signed*” setting to match.

6. The next section provides Attribute Statements for mapping Okta fields to SearchStax. Below are sample mappings that we defined
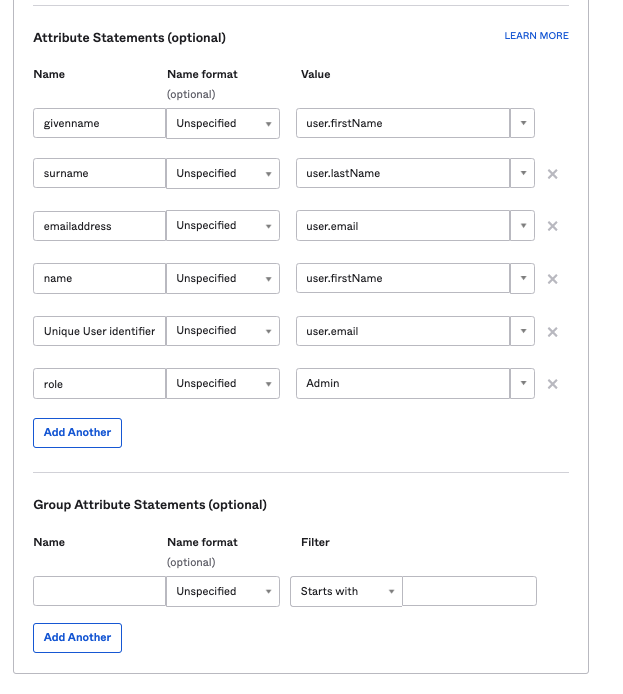
The above example assigns the role of “Admin” to all users in SearchStax Cloud. However, if you have a different field in Okta that maps the role, you can assign that field instead. Here is more information about roles in SearchStax Cloud. If a role is not specified, users will be provisioned with the “Team Member” role, which is a read-only role.
Click on Next.
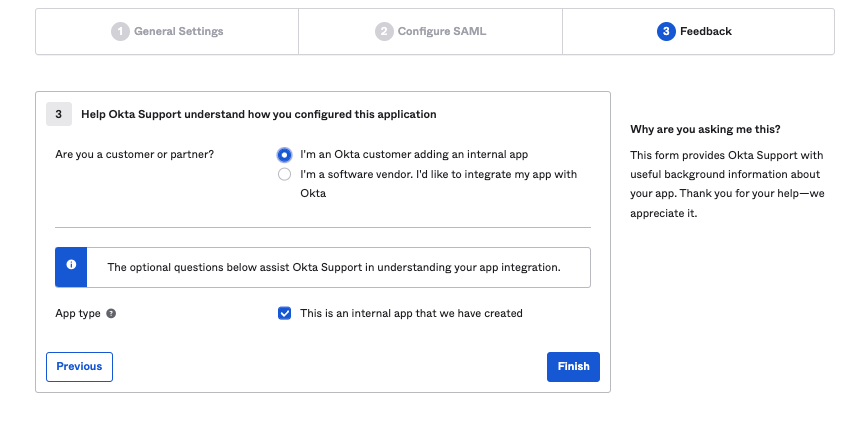
7. Select “I’m an Okta customer adding an internal app” and click on “Finish”
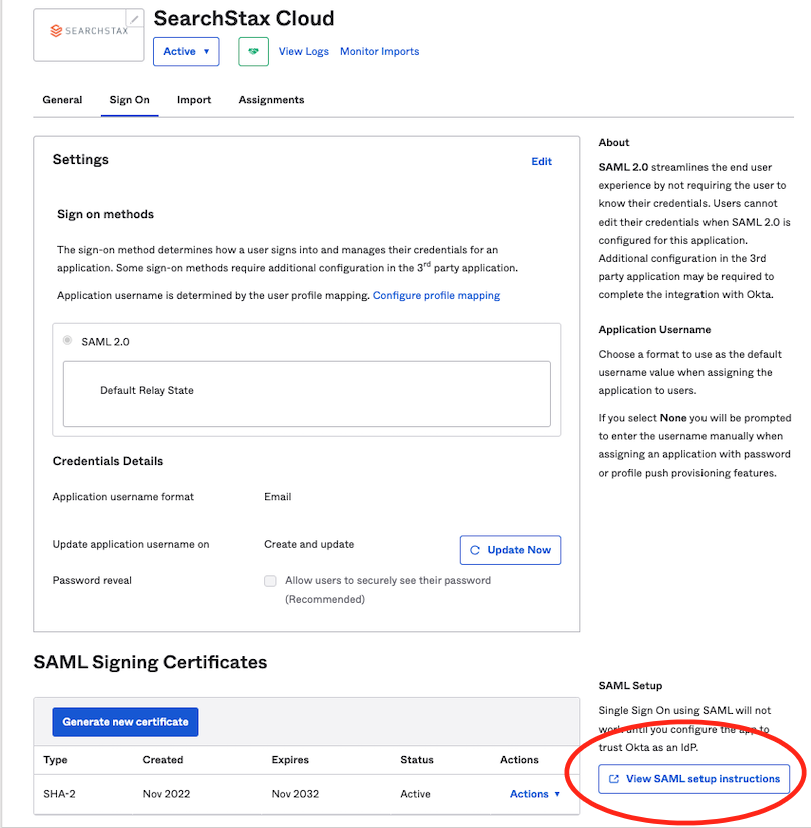
8. Now click on the “View SAML setup instructions” button that is displayed to the right
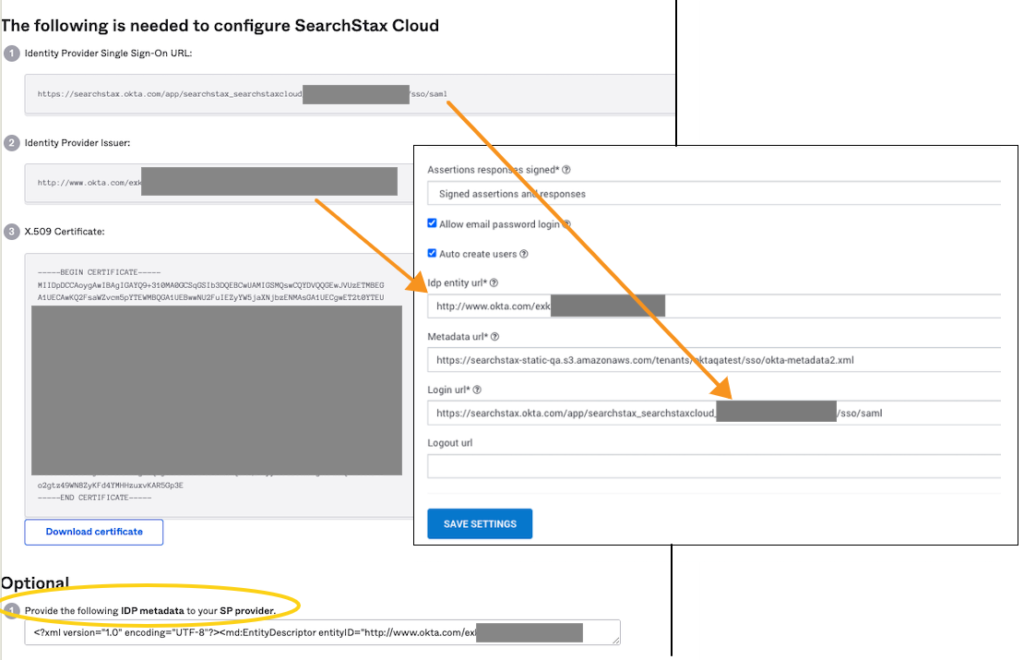
9. Copy the “Identity Provider Single Sign-On URL” from the screen and set it as the Login url in SearchStax Cloud.
10. Copy the “Identity Provider Issuer” from the screen and set it as the Idp entity url in SearchStax Cloud.
11. Copy the XML shown in the Optional section with the title “Provide the following IDP metadata to your SP Provider” and host it on a URL (optionally, you can send it to us and we can host this for you). Copy this hosted IDP metadata URL and set it as the Metadata url in SearchStax Cloud.
12. Now, set SSO to “Enabled”.
When you are testing, also check “Allow email password login” (You can turn this off once SSO testing is complete). Here is our example setting page:
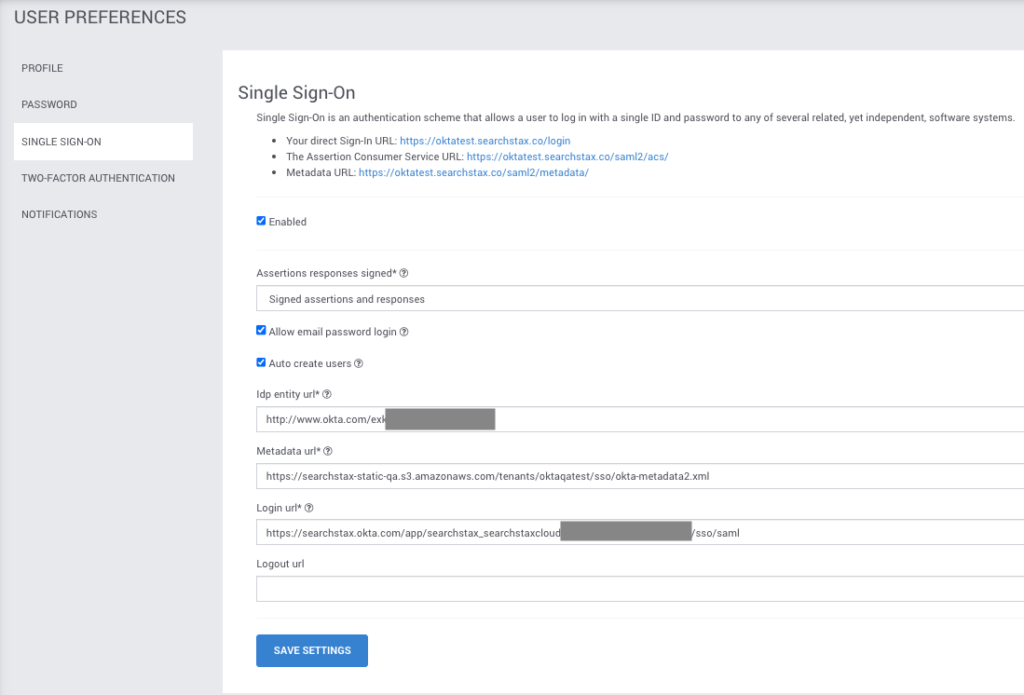
Once set up is complete, the “Your direct Sign-In URL” is the URL that your team can use for signing into SearchStax Cloud. They can also enter the domain name mentioned when choosing Single Sign-On from the SearchStax Cloud Sign-In page.
Login Using SSO
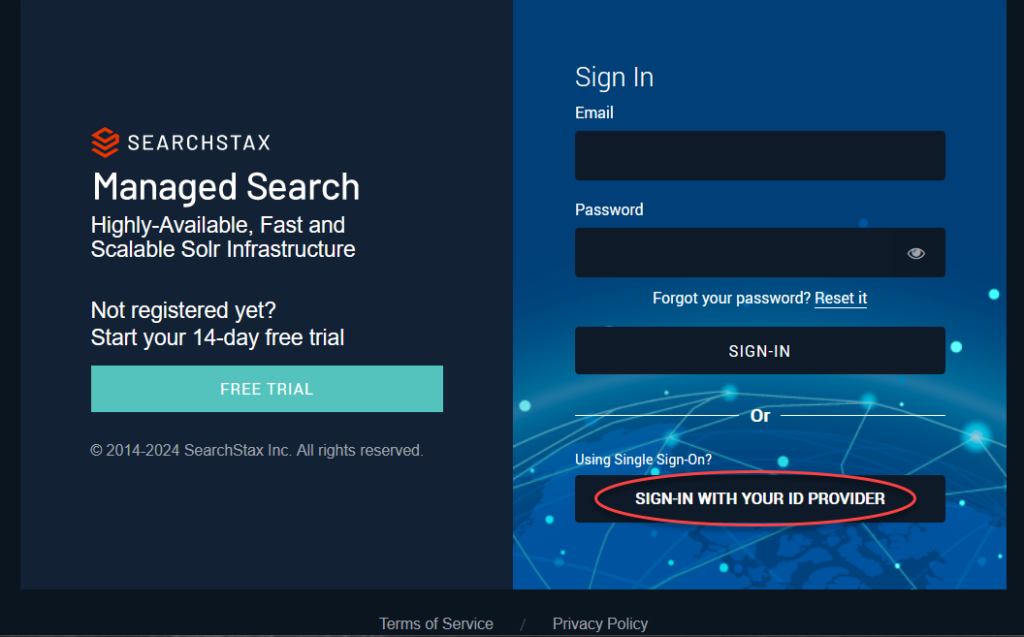
On https://app.searchstax.com/ , click the “Sign-In With your ID Provider” button.
Enter the domain.
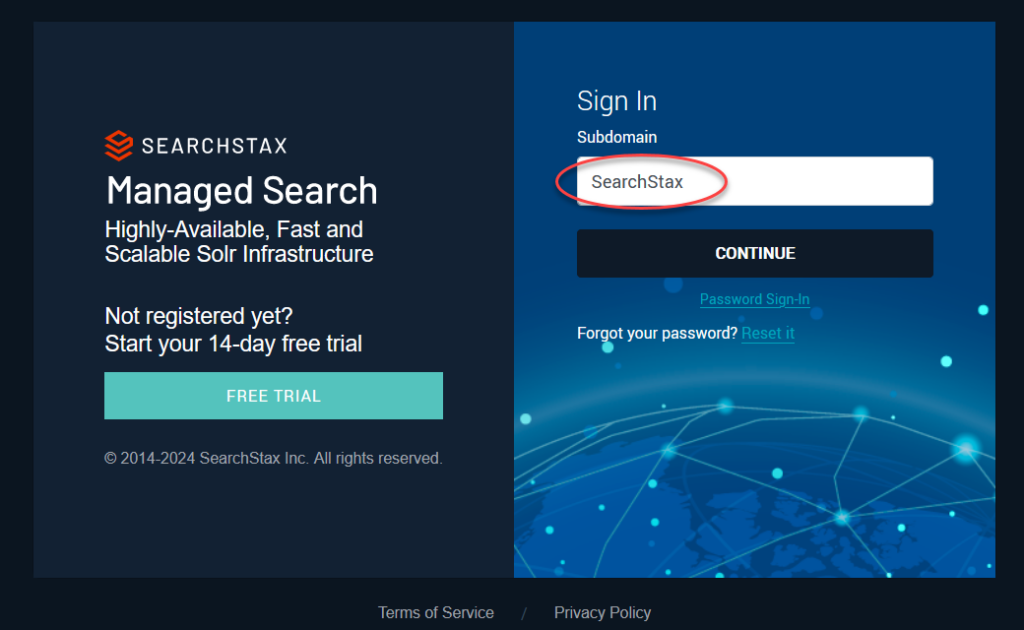
Click Continue. This takes you to the Okta Sign-in page. After you authenticate, it brings you back to your SearchStax Cloud Dashboard.
Alternately, you can directly go to https://<Subdomain>.searchstax.com to login, and clicking on the “Sign-In With your ID Provider” will take you directly to Okta Sign In.
SSO + Two-factor Authentication
A User can have SSO and Two-Factor authentication both setup. The 2FA settings for a user will apply to all accounts that the user has access to.
However, for the account that has SSO Setup, while logging in, SearchStax 2FA settings will not apply. In that case, 2FA should be set up at the SSO Provider.
Questions?
Do not hesitate to contact the SearchStax Support Desk.