
December 14, 2023
Kevin Montgomery
|
How to Use SearchStax APIs with WordPress
Site search is a core feature for most websites. Search helps your visitors find content throughout your site without having to click through navigation, menus, and links – users can just type in what they’re interested in and select the best result for their needs.
Many content management systems include or support basic site search – but these simple search features can be difficult to scale, lack customization, and aren’t easy to optimize for your site design and visitor needs.
SearchStax Managed Search and SearchStax Site Search both provide the search engine and infrastructure for site search without having to manage servers, scale infrastructure, or deal with software and security upgrades. SearchStax makes it easier to add powerful customizable site search to any website or CMS with our easy-to-use search APIs.
We’ll show you how to set up SearchStax Managed Search or Site Search and add site search using WordPress as an example. Here’s the github repo for the SearchStax WordPress module that this post is based on. You can clone or download this WordPress module and add it to your WordPress site to use SearchStax. Many of these API calls and design patterns are applicable for other content management systems and backend languages.
Here’s what’s inside:
SearchStax provides API endpoints for read-only operations (such as querying search results) and administrative read/write operations such as indexing new content, deleting items from the index, and updating schema. API requests will need to include the authorization token for all read and write/update operations.
You should protect your request tokens and avoid exposing the read/write token publicly. Read-only tokens should also be protected from public exposure so that bad actors don’t abuse or overuse the limited monthly API requests.
In this example we’ll be making SearchStax API calls from the WordPress backend – this ensures that search requests and updates can only come from the actions on the WordPress front end (either site administrators or visitors). This helps protect the API endpoints and tokens from leaking publicly.
Many SearchStax API requests can be made by passing data in URL parameters with a GET request to the API endpoint and including the authorization token in the request header.
					curl "https://<api-endpoint>.searchstax.com/<_id_>/<_indexName_>/select?q=*:*&wt=json" \
-H "Authorization: Token <_readToken_>"
Others may require passing a JSON object in a POST request body to change or update the index.
					curl -X POST "https://<api-endpoint>.searchstax.com/<_id_>/<_indexName_>/select?q=*:*&wt=json" \
-H "Authorization: Token <_readToken_> \
,Content-type: application/json"
-d "{
  "add-field": {
    "name": "title",
    "type": "string",
    "indexed": true,
    "required": false,
    "stored": true,
    "multiValued": false
  }
}"
The first step toward indexing site content is storing API and token details in order to start making requests. In our WordPress example we’re capturing the API endpoint URLs and access tokens with an administrator options page. Other options include storing URLs and access tokens in environmental variables and including them in the deploy process so that your website or CMS can securely access them to make API requests.
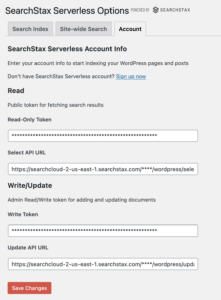
Once the admin has provided the relevant credentials you can make a request to the SELECT endpoint and you should get the following response if your account and Solr index is set up properly.
					curl "https://<api-endpoint>.searchstax.com/<_id_>/<_indexName_>/select?q=*:*&wt=json" \
-H "Authorization: Token <_readToken_>"

// response
{
  status: 0,
  QTime: 13
}
A response that includes `status: 0` means the request was successful.
Now that we’re able to connect to the SearchStax API we can begin setting up the search index for our site and the content that we’ll be indexing.
We’re going to use the UPDATE API to set up the search fields and schema. We’ll be using the post type, category, and tag fields that are included in WordPress for our facets. We’ll also define a couple of other standard WordPress post fields.
This example adds a tags field and sets the type to ‘string’ and multiValued to ‘true’. We’ll be able to use this field later for faceting so that we can return the relevant tags for each post that’s included in search results.
					curl -X POST "https://<api-endpoint>.searchstax.com/<_id_>/<_indexName_>/select?q=*:*&wt=json" \
-H "Authorization: Token <_readToken_> \
,Content-type: application/json"
-d "{
  "add-field": {
    "name": "tags",
    "type": "string",
    "indexed": true,
    "required": false,
    "stored": true,
    "multiValued": true
  },
  //...additional fields...,
}"
Ideally you shouldn’t need to change your search schema after it’s been initially set up – but you will need to update your search schema if you’re adding new fields or facets to your site so that they can be indexed properly.
Now that we’ve connected to the SearchStax instance and set up fields and their schema we can start preparing site content to push to the search index.
SearchStax search indexes use a unique ID field to track every document in the search index. We’ll need to create a document ID naming convention to ensure indexed content is unique and that it matches the content stored in the CMS or database. In many cases we can reuse the internal unique identifiers that your CMS is already using to track pages.
In our WordPress example we can create a function that will build request JSON for a post with the appropriate fields that match the search schema. The unique document IDs use the post-type prefix followed by the post ID (WordPress tracks pages and posts separately so if we just used post ID by itself we might overwrite pages or posts that have the same ID).
This function accepts a WordPress post object and the Solr document ID that we’re using to identify the post. We’re going to limit the body field to 100,000 characters for each post and the summary field will use the first 300 characters of the body content if a post summary is not available.
					public function post_to_solr_json( $post, $solr_id ) {
   	 $max_doc_size = 100000;
	 $max_summary_length = 300;

   	 $post_categories = wp_get_post_categories($post->ID);
   	 $categories = array();
   	 foreach ( $post_categories as $this_category) {
   		 $category = get_category($this_category);
   		 $categories[] = $category->name;
   	 }

   	 $post_tags = wp_get_post_tags($post->ID);
   	 $tags = array();
   	 foreach ( $post_tags as $this_tag) {
   		 $tags[] = $this_tag->name;
   	 }

   	 $solrDoc = array();

   	 $solrDoc['id'] = $solr_id;
   	 $solrDoc['title'] = $post->post_title;
   	 if( $post->post_excerpt != '' ) {
   		 $solrDoc['summary'] = $post->post_excerpt;
   	 }
   	 else {
   		 $solrDoc['summary'] = substr( wp_strip_all_tags( $post->post_content, true ), 0, $max_summary_length );
   	 }
   	 $solrDoc['body'] = substr( $post->post_content, 0, $max_doc_size );
   	 $solrDoc['thumbnail'] = wp_get_attachment_url( get_post_thumbnail_id($post->ID), 'thumbnail' );
   	 $solrDoc['guid'] = $post->guid;
   	 $solrDoc['url'] = get_permalink($post);
   	 $solrDoc['post_date'] = $post->post_date;
   	 $solrDoc['post_type'] = $post->post_type;
   	 $solrDoc['post_author'] = $post->post_author;
   	 $solrDoc['categories'] = $categories;
   	 $solrDoc['tags'] = $tags;

   	 return $solrDoc;
}
Search indexes can be updated in batches or individually as needed. When we’re first adding site search to an existing site we’ll want to index all available content to get started. After that we can make updates to individual documents in the search index as needed when page content changes.
SearchStax Managed Search and Site Search have different request and API limits depending on your subscription – including maximum request size, maximum requests per minute, and maximum total number of documents in the index. You’ll need to configure your batching operations to ensure you don’t push too many documents into your index and that your request sizes are under the limits.
For our WordPress plugin we’ll need to get all posts that have a post_status of ‘publish’. We’ll get the Solr JSON for each post using the function we wrote before and then start submitting these documents to the search index in batches.
In this example we’re submitting 20 posts in each batch and waiting 250 milliseconds between each request with a maximum processing time of 30 seconds. We’re checking the API response code for each batch and keeping track of total request time so we can catch any errors or avoid going over API limitations.
					public function index_content() {
    $return = array();
    $return['status'] = 'none';
    $return['data'] = array();
    $post_batch = array();

    $posts = get_posts([
      'post_status' => 'publish',
      'numberposts' => -1
    ]);

    foreach ( $posts as $post ) {
   	 $post_batch[] = $this->post_to_solr_json($post, $post->post_type . '_' . $post->ID);
    }

    $batch_size = 20;
    $batches = ceil(count($post_batch) / $batch_size);
    $timeout = time() + 30;
    $delay = 250;
    $data = array();

    for ( $i = 0; $i < $batches; $i++ ) {
   	 $status = $this->push_to_solr( array_slice( $post_batch, $i * $batch_size, $batch_size ) );

   	 if ( $status['status'] == 'success' ) {
   		 $data = array_merge( $data, $status['data'] );
   	 }
   	 else {
   		 $return['status'] = $status['status'];
   		 break;
   	 }

   	 if ( time() > $timeout ) {
   		 $return['status'] = 'timeout';
   		 break;
   	 }
   	 set_time_limit(20);
   	 usleep( $delay );
    }

    if ( $return['status'] == 'none' ) {
   	 $return['status'] = 'success';
   	 $return['data']['posts'] = 'Successfully indexed ' . count( $data ) . ' items';
    }
    return json_encode( $return );
}
					curl -X POST "https://<api-endpoint>.searchstax.com/<_id_>/<_indexName_>/select?q=*:*&wt=json" \
-H "Authorization: Token <_readToken_> \
,Content-type: application/json"
-d "[
  {
    "id": "post_123",
    "title": "Post Title",
    ...
  }
]"
As sites are updated and pages change we’ll likely need to remove content from the Solr index. This can be done on a per-document basis or we can empty the entire index if needed to start over.
We can remove a document by submitting a delete request to the UPDATE API endpoint and include the document ID in the request body.
					curl -X POST "https://<api-endpoint>.searchstax.com/<_id_>/<_indexName_>/update" \
-H "Authorization: Token <_readToken_> \
,Content-type: application/json"
-d "{"delete":"post_id_123"}"
It may be necessary to delete everything in the search index and start over if we’ve made major changes to the site, don’t want to delete individual documents, or have made changes to the schema.
					curl -X POST "https://<api-endpoint>.searchstax.com/<_id_>/<_indexName_>/update" \
-H "Authorization: Token <_readToken_> \
,Content-type: application/json"
-d "{"delete": {"query": "*:*"}}"
This request deletes anything that matches the wildcard query (every indexed document) and is not reversible.
					curl "https://<api-endpoint>.searchstax.com/<_id_>/<_indexName_>/select?q=body:*search_term*&wt=json" \
-H "Authorization: Token <_readToken_>"
					curl "https://<api-endpoint>.searchstax.com/<_id_>/<_indexName_>/select
?q=body:*search_term*
&rows=50
&facet=true
&facet.field=tags
&f.tags.facet.sort=index
&facet.mincount=1
&wt=json
" \
-H "Authorization: Token <_readToken_>"
Yes it’s possible to use SearchStax Managed Search and SearchStax Site Search with WordPress when using our REST APIs.
Copyrights © SearchStax Inc.2014-2024. All Rights Reserved.
SearchStax Site Search solution is engineered to give marketers the agility they need to optimize site search outcomes. Get full visibility into search analytics and make real-time changes with one click.
close
SearchStax Managed Search service automates, manages and scales hosted Solr infrastructure in public or private clouds. Free up developers for value-added tasks and reduce costs with fewer incidents.
close
close
close