
SearchStax Cloud Dedicated Deployments
Overview
SearchStax Cloud lets you create as many deployments as you require for the unique needs of your Solr-based applications. When you create a deployment you can choose your Cloud Provider, Plan, and Solr version. Once a deployment is created, you can secure it using advanced networking capabilities. Then you can configure and populate your Solr collections.
Providers, Regions, Deployments, and Prices
Solr Versions Supported by SearchStax
Cloud Providers and Regions Supported by SearchStax
Select a Product for Pricing Details
Please contact us for complete information on SearchStax cloud providers, regions, and Solr deployment plans.
Contents:
- Creating a Deployment
- Managing Your Deployments
- Charges
- Changing/Scaling a Deployment
- Deleting a Deployment
Creating a Deployment
Deployments are created via the Dedicated Infrastructure screen.
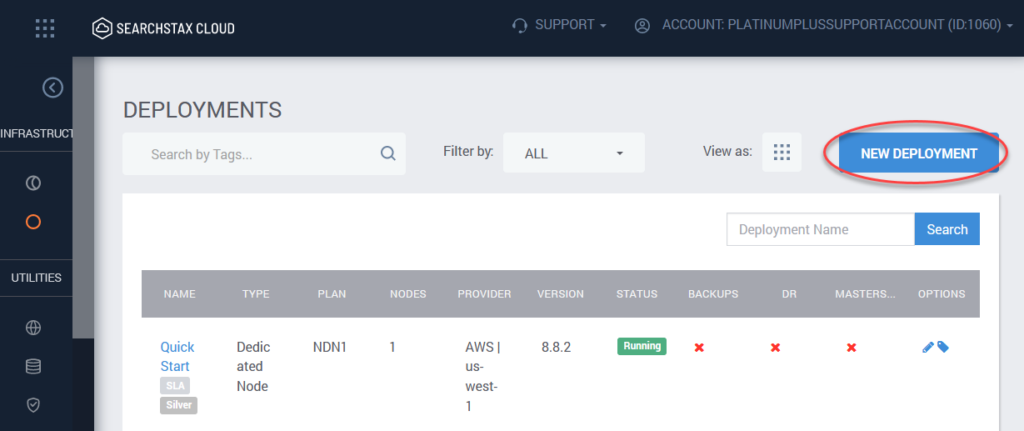
To create a Deployment:
- From your Dedicated Infrastructure screen, click on New Deployment.
- Provide a name for the Solr Deployment.
- Specify the Cloud Provider, Region, Plan Tier, and Solr version for your Deployment.
- Select the number of nodes and amount of memory/disk space.
- Click on Create Deployment.
To create a new Dedicated Deployment, click the Create Deployment button. This opens an interactive page that lets you configure all aspects of your deployment and see what each decision means in terms of your monthly fees.
The first decision is whether to use a single node or a cluster. In general, single nodes are for experiments and proof-of-concept systems, while clusters support production systems. (Often a client will create multiple clusters for production, disaster recovery, UAT testing, and QA.)
Enter a name for the deployment, and select an appropriate Solr version. Note that only certain versions of Solr are compatible with Sitecore.

Choose a Cloud Provider and a Region for the new deployment.

The sliders let you select the number of nodes to include in the cluster, and how much memory and disk space to include on each node.
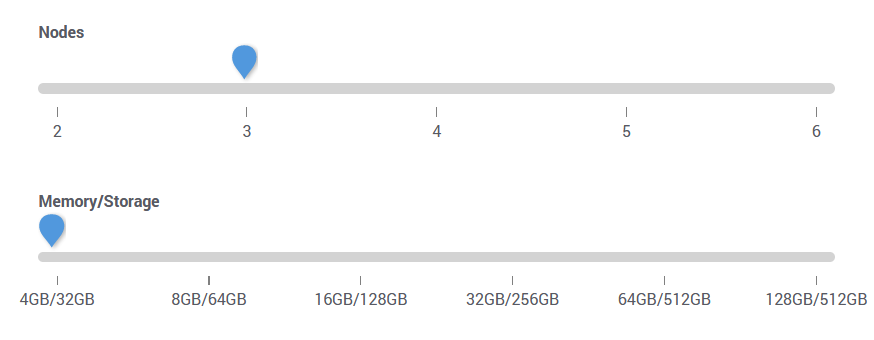
Creating Large Multi-Node Deployments
The UI lets you create a cluster with a maximum of six nodes. That’s two standard Solr nodes plus four add-on nodes.
The SearchStax dashboard lets you add more nodes later, up to a total of 10 add-on nodes.
If you expect to scale the deployment above this level, you must create it using the SearchStax Deployment API. Specify 10 add-on nodes. This automatically allocates a large IP subnet that can support many nodes. Once created, you can scale the actual number of nodes up or down through the SearchStax dashboard.
Plan Tiers correspond to SearchStax Cloud Support-Level Agreements (SLAs). They define what levels of responsiveness, up-time guarantees, and access to special features the deployment will have.

Backups are optional. If this will be a production system, daily backups are recommended.

SearchStax offers Cold, Warm, and Hot Disaster Recovery to meet your needs for failover behavior.

Dedicated deployments are protected by layers of security features. This lets you secure the cluster via a specific IP address, a range of IP addresses, and/or through Solr Basic Auth. High-security systems can be isolated on Virtual Private Networks (VPNs).

Review the deployment specifications and the monthly fee and then proceed to the checkout page.

It takes a few minutes…
It usually takes five minutes to set up a single-node deployment, and up to fifteen minutes to set up a cluster, using AWS or GCP. Azure setup times range from twenty minutes to an hour. Feel free to explore our documentation and Help Center until the process is completed.
You can secure your new Solr deployment using its Security Settings. This lets you secure the cluster via a specific IP address, a range of IP addresses, and/or through Solr Basic Auth.
Managing Your Deployments
SearchStax Cloud deployments are administered through the Dedicated Infrastructure screen and the Deployment Details overview.
When you create a Solr Deployment you will be sent an email with useful helper scripts for easily configuring Zookeeper, creating Solr collections, and populating your Solr collections with data (documents). You can then use the SearchStax Cloud Dashboard to monitor the performance of your Solr deployment, including key server metrics such as CPU and Memory utilization, Search Throughput, and Indexing throughput. These reports help you to tune your Solr deployments.
The Termination Lock button blocks any attempt to delete this deployment until you manually reset the button.
Charges
SearchStax Cloud pay-as-you-go deployments are billed automatically each month based on the chosen plan.
Short-Lived Deployments
SearchStax bills pay-as-you-go deployments on a pro-rated basis. If a deployment is active for a fraction of a month, you will be billed the corresponding fraction of the monthly rate.
If you create and then delete a deployment on the same day, you will be billed for one day at that plan’s monthly rate.
Month-to-Month vs. Annual Commitment
The prices shown when creating a new deployment in SearchStax Cloud are the month-to-month self-service rates. Much lower rates apply to annual commitments, sometimes as much as 50% lower! Please contact us for further information.
Scaling a Deployment
Dedicated clusters may be scaled up or down to meet seasonal needs.
Upgrade Deployment or Add Nodes?
User queries are automatically distributed over all nodes of your cluster. If the deployment is stressed by queries, adding nodes will address the issue.
Indexing of any specific collection occurs on one node only. If the indexing node is overloaded, upgrading to a deployment with more CPUs, memory, and disk space is the better path.
You can add nodes to clusters on the Deployment Details page, and, once added, you can click a link to delete the node again. (See the note on “Short-Lived Deployments,” above, for billing details.)
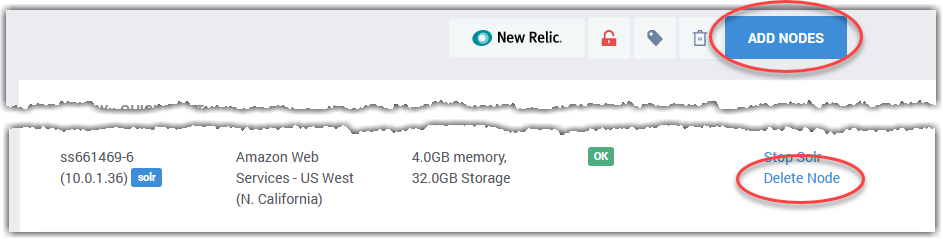
Bear in mind that adding a node to an existing cluster might be a sign that you need to upgrade your deployment to the next plan.
Deleting a Deployment
You can delete a deployment from the SearchStax Cloud Dashboard.
Warning: Save your Data!
Consider backing up your deployment before deleting it. Backups survive the deletion of a deployment.

To delete a deployment:
- Open the details page of the deployment that you want to delete.
- Check the Terminiation Lock button. If it is on (green) unlock it (red).
- Click the Trash Can button next to the Add Nodes button.
- Confirm the action.

Questions?
Do not hesitate to contact the SearchStax Support Desk.